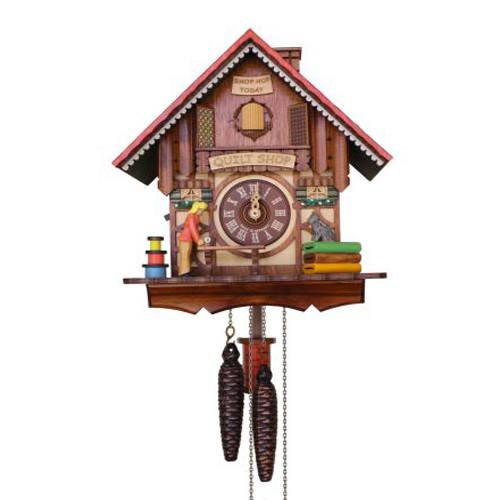
The Birdwatcher Cuckoo Clock simply happened. The Modern Quilt Cuckoo Clock was going back and forth from the CNC guy to the carver, the laser guy to the carver… a slow but necessary process to get the clock just right and an efficient production process figured out. Meanwhile I was dying for my first made in American cuckoo clock to make its debut!
Designing the Cuckoo Clock
Late on December 19th 2017 I powered up Corel Draw, opened a new file, dropped the clock case for the Modern Quilt Cuckoo Clock into it, and started doodling, drawing shapes over it. I had an outdoor themed clock in mind. Could be fishing, skiing, riding horses through the woods…
Trees, bushes, and flowers sprouted on the clock. Then a Chickadee. And a Cardinal. Hum, what about a birdwatcher? The hole for the animation on the Modern Quilt Cuckoo Clock box was in the exact right place, at her shoulder. Ah, I’ve got it! She can lift her arm holding a pair of binoculars. Perfect!
The basic design now drawn out and the shapes printed, I needed to make them from wood. Oh boy. Put fabric in front of me and I can make anything, but wood? Yikes!

First Prototype
I scurried off to Lowe’s and bought some poplar. Back at home I traced the shapes onto the wood. After a friend gave me a five minute lesson on using (an old, borrowed) scroll saw I held my breath and made my first few cuts. You Tube videos helped me increase my skills to make shapes that were good enough to test out my concept.
Influenced by German folk carvings, the picture I had in mind was akin to wooden Waldorf toys. To achieve the carved edges I tried my hand at a Dremel and ended up with a flexible shaft from Harbor Freight. Using sanding drums, I got close to the effect I wanted. I also tried a sanding mop, which made short work of smoothing intricate cuttings.
Next up, paint. From my research the Waldorf toys are painted with acrylics so I got out my basket of them, many of which had dried up. Off to Hobby Lobby for replacements. Back home I experimented to get the effect I wanted. I ended up thinning the paint and wiping it off after painting it on. A few coats of spray shellac made it clear gloss was not the finish to go with. Noted, but let’s move on with this test, please!
With most of the basic pieces cut, sanded, and painted, I laid out the clock. OH MY!!! Not only did I love it, but it was the essence of what my business looks like inside my head come to life!
Building the Cuckoo Clock
For the Modern Quilt Cuckoo Clock I had gone to him to put together an MDF prototype just to make sure all the parts worked before committing to real wood. Hum, I thought, I know how to do it. At least I could get the movement and bellows in a clock.
I didn’t have the right wire, but I dove in anyway. And I didn’t stop at just the cuckoo. At the end of the day I had a cuckoo clock cuckooing to me from the living room, with a birdwatcher raising her binoculars and a Towhee pecking. No winking sun and clouds on top yet, but I had made a cuckoo clock!
That was Monday, February 5. I sent Keith a text asking when I could come up as I had a surprise for him. He replied that he was just getting over the flu so suggested Friday afternoon. That was a long four days! February 9 arrived. I walked in and plunked the clock on the counter in front of him. Was he surprised that I had built a cuckoo clock start to finish? Zero. We went through every aspect of it. He gave me some fantastic pointers and suggestions such as using a grandfather hammer for the gong. And leads on such things as what wire I need to be able to bend it but still retain its shape. Several times he remarked about the design and the depth. He was impressed!

Yes to Technology!
Hand cutting the pieces with a scroll saw simply makes no sense for building clocks in any quantity, so I contacted my friend Andi Barney who replied that yes, her husband Paul of Lasting Impressions would be happy to laser cut my clock pieces for me. Off to fetch some poplar, cut it, and plane it so Paul could cut a few test sets.
I took my laptop to Paul’s workshop and away we went. Andi and I were engrossed in working on something, not paying attention, when Paul took a bunch of pieces out of the laser cutter and, using the colored clock layout I had brought, layered up the pieces. When my eyes caught sight it, my heart jumped into my throat – in a good way. They were just bare, unpainted wood, but boy it looked great! We all loved the depth the laser edges gave it. Rather than producing a negative, technology created a plus to the designs!
Still, back at the farm, I toyed around with my original idea of softening the edges by carving them, and painting them. But putting the fresh-from-the-laser parts on an actual clock box I discovered that I really liked the dark edges. At the time I was working with Beth Ferrier and Sarah Ann Smith on my “I’m Cuckoo for Quilting” Designer Cuckoo Clock Challenge. I ran it by them and they both gasped. They loved the depth of the charred edges. Okay, charred it is!
Then I was back to Paul to make a few adjustments and to get several sets of parts made to make my first real clock.
Back at my living room-turned-workshop the for-real painting and finishing experiments started. Between image searches and consulting iBird on my phone, I worked through getting the birdwatcher and the birds how I wanted them. You get better and better at a thing as you repeat it! It seemed like a ton of parts at first, and yet another huge learning curve. But I kept holding my nose and jumping in. Slowly, over the period of a few days, the finished parts started to literally paint the picture.
Finally it was time to put the decorative parts on the clock. As it did electronically, in reality everything fit! Wood glue and a pin nailer and the clock was together. Then I was off to clean the barn and run errands. It wasn’t until later that evening that I walked in and saw the clock sitting on the counter in the kitchen, almost surprised by it. I put it on a table in front of the fire and stared at it. I put my second guessing aside and simply enjoyed it. I had built a cuckoo clock. Well, the case and the outside anyway.
Next up: The clockworks. Keith Seabolt had put out the red carpet for me to set up shop for a day or two or whatever it would take to show me how to install all of the clockworks and make finished, boxed and ready to go clocks. He had told me that in one day I’d be making them on my own. That’s what gave me the confidence to even think I could become a clock maker.

Into Production!
It was time for a small production. Paul prepared a bunch of sets of parts for me this time. Neatly bagging them for me.
With all deemed working, I was back in my tack room-turned-wood shop/paint shop to assemble clock cases.
The clock cases are made of Baltic Birch plywood.
The clock case and shelf parts require three colors of stain. Here I am testing the stains.
And get all the parts stained and painted and sealed.
All wooden parts are painted, then sealed with three coats of shellac.
I took a couple of clocks up to Keith’s. He put the parts in while I watched so I could fine tune my skills. I took home a working clock, all ready for me to copy. Who knew that I would ever need to master the art of wire bending?<
Back home it was time to get ready for a real production run. I ordered a whole bunch of cuckoo clock parts, which Penny, the Inventory Manager, is right on top of!
With the cases assembled, stained, and varnished, I added the decorative parts, then installed the clockworks.
Boxes and packing Materials were delivered under Delight’s watchful eye.
As I write this I just delivered the first ten cuckoo clocks to Keith Seabolt, cuckoo doc extraordinaire. He will set them up on his test stand, make tweaks, and run them for several days, adjusting them so they work perfectly. I am tremendously thankful to him as there’s no better cuckoo doc outside of the Black Forest. Once he deems them perfect the first American made cuckoo clocks will be available for sale!I have made those first ten clocks available for pre-order as some kind people have asked. Click on over and order one of the first cuckoo clocks made in America in decades!
Leave A Comment